Your Hubox Unifi Controller makes it easy to upgrade your device firmware. In most cases, a couple of clicks are all that's required. However, in some very rare cases, you may need to 'rescue' a failed upgrade with a manual upgrade via your controller GUI, or in very rare cases, via command line into the device.
When you see the 'upgrade' button in the controller indicating that new firmware is available, it's natural to click it because you want the latest and greatest. An important caveat however is that this is often unwise. If everything is working in your environment, and the new firmware doesn't add anything new or important for you, it's often best to just leave things as they are.
Ubiquiti have a terrible habit of releasing beta firmware that has not been thoroughly tested. You may end up breaking your network by introducing new bugs.
MSP style advice from enterprise network admins is to NOT be 'click-happy' - Click the Upgrade button with caution!
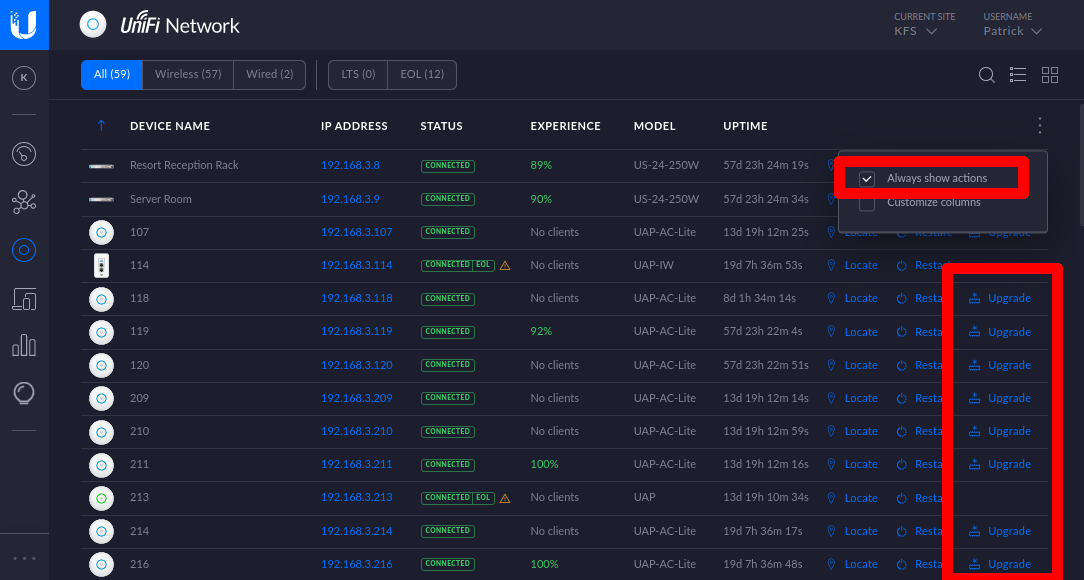
The key sections are highlighted below in red. . .

If the 'Always show actions' box is checked, you will always see devices with upgrades available. Clicking upgrade will have obvious results i.e. the device will become unavailable for five or ten minutes while it downloads firmware and goes through the process of installing it. DO NOT power off the device during this action, you could brick it, and only do this during your maintenance window so that minimum disruption is caused.
In most cases, the process will be successful and it will come back up as 'Provisioning', and then 'Connected'
On some older devices, it can be helpful to restart the device BEFORE upgrading. This ensures the device RAM is cleared down and there is enough available for the upgrade process. When an upgrade fails, it usually succeeds after a restart and a second attempt at upgrading.
Manual Upgrades
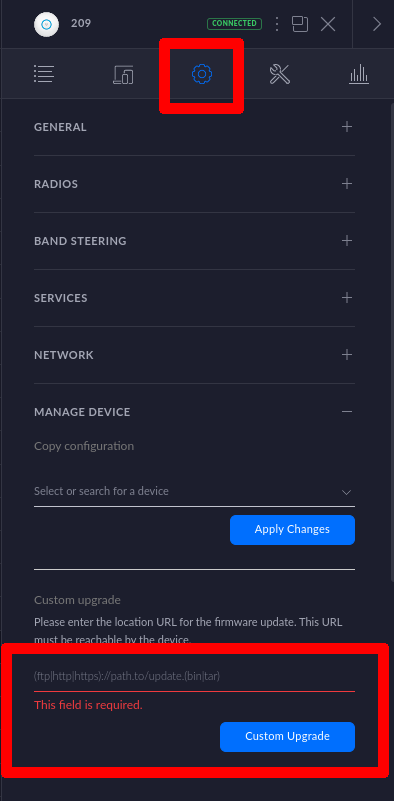
In some cases it may be necessary to provide the controller with a specific firmware version. Maybe you have clicked upgrade and don't like the results, so you want to downgrade to a previous firmware. This is pretty straightforward, you can download specific firmware versions for each device from the Ubiquiti website and then upload it to the device via the Hubox GUI, like so. . . again, the relevant parts are highlighted in red. . .

. . . click the gear icon for the device management settings, and simply give the controller the URL of the desired firmware, click 'Custom Upgrade' and the desired firmware will be installed to the device. Job done.
Command Line Upgrade via SSH
There may be times when the only way to upgrade is via SSH. This is usually a last resort and for emergencies only. There may also be times when you have been shipped a device with very old firmware (been sitting in a warehouse for years) and the controller cannot or will not adopt it until the firmware have been updated.
Once again, the desired firmware can be located on the Ubiquiti website (usually you will select the latest version). Copy the URL of the firmware to your clipboard, or paste it to a notepad for the following steps. . .
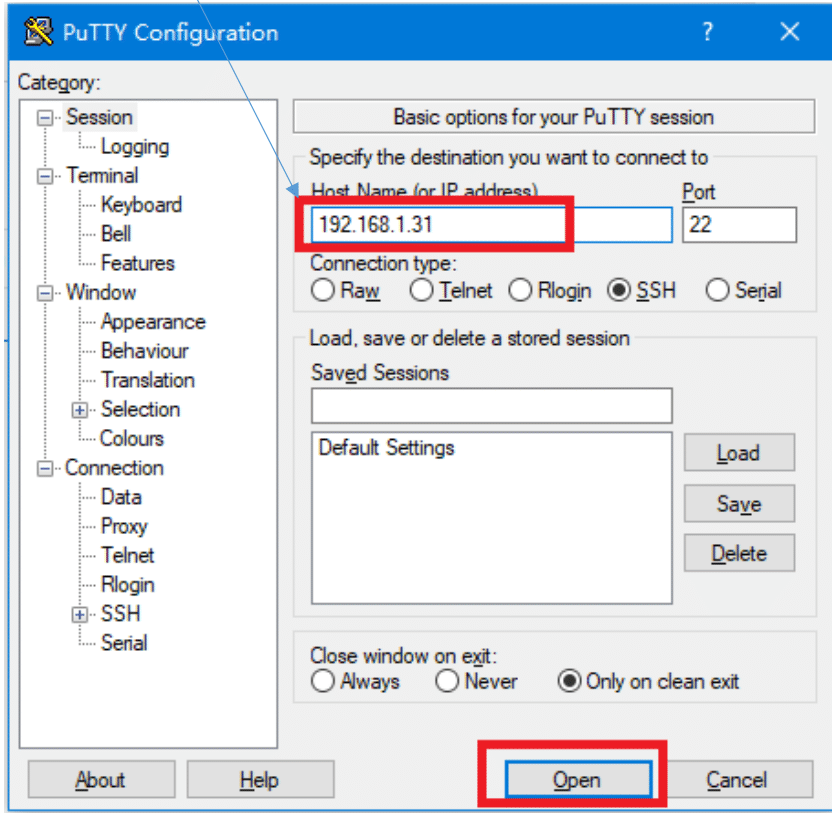
Identify the device IP address in question on your network and connect to it with your favorite SSH client. Windows users will be using PuTTY. Linux users will use the terminal client present in all Linux distributions. The example below uses PuTTY. . .

If the device is defaulted, the login credentials are:
User: ubnt
Pass: ubnt
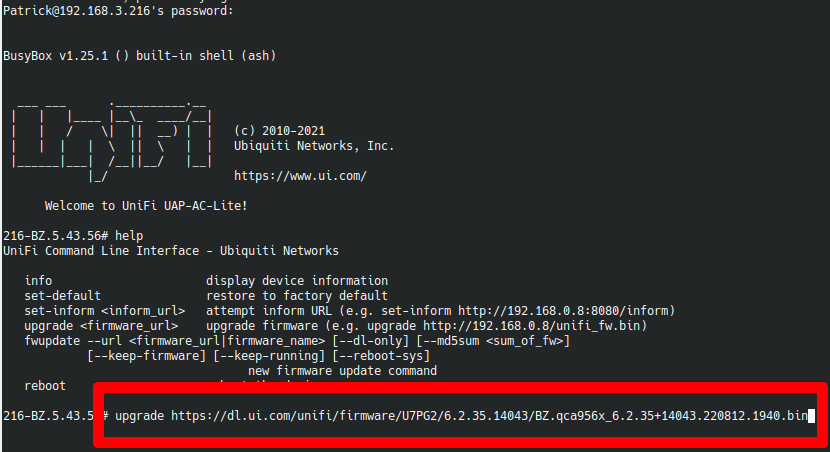
After logging into the command line, you can type 'help' to see the commands available. The one you need here is 'upgrade', followed by the URL you copied before from the Ubiquiti website. . .
UDM, UDM-Pro, and UXG-Pro devices, swap 'upgrade' with 'ubnt-upgrade'
UCK G2, UCK G2 Plus, UDM SE, UDR, UDW, UNVR, UNVR Pro devices, swap 'upgrade' with 'ubnt-systool fwupdate'

. . . Hit enter and the upgrade process will begin. Using a URL from the Ubiquiti website will only work if the device has access to the internet.
Occasionally, you may find yourself with a device with firmware that is SO old, the SSL libraries are obsolete. In this case, the URL from the Ubiquiti website won't work. The work around is to use the non-SSL version of the URL. So, just use http:// instead of https://
Note that if none of the above methods are working for you, this takes us into advanced device recovery territory using TFTP and Console recovery methods, which are beyond the scope of this article. We will write another set of instructions for that.

 UniFi
UniFi Omada
Omada UISP
UISP


